Input
Input Module: Friendly Configuration Guide
Hello! Welcome to the Input Module configuration in OmniQ. This tool allows your bot to request information from people (like a name or phone number) and ensure it's correct before continuing. It's like giving your bot a checklist for what it needs. You configure everything in a simple window, without needing to know how to program!
What does the Input Module do?
The Input Module tells your bot:
- What type of information to request (like an email or an image).
- Save what the person responds if it's correct.
- Display an error message if something isn't right and ask for it again.
You'll configure this in a popup window with three easy-to-fill fields.
Step-by-Step Configuration in the Popup Window
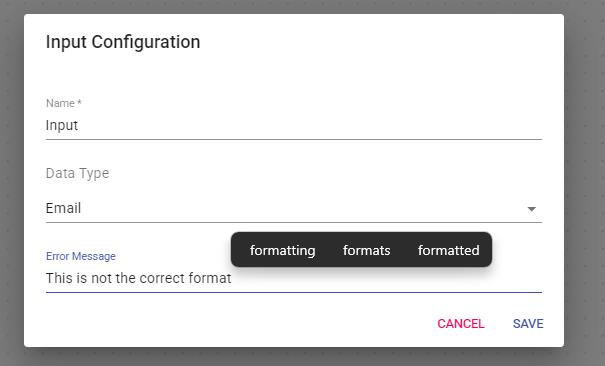
When you open this tool, you'll see a window titled "Input Configuration". Here's how to use it:
1. Name Your Module
- Where: The "Name" text box.
- What it does: It's a label to identify this module (like "Request Phone" or "Customer Email").
- How to set it up: Write something short and clear. It's mandatory!
Example: Write "Get Email".
2. Choose the Data Type
- Where: The "Data Type" dropdown menu.
- What it does: Defines what type of response you expect (like text, number, or file).
- How to set it up: Click and choose an option from the list:
- String: Simple text (like a name).
- Phone Number: Phone number.
- Email: Email address.
- Number: Numbers only (like an age).
- Zip Code: Postal code.
- Image: An image.
- Audio: An audio file.
- Document: A document (like PDF).
- It's mandatory to choose one!
Example: Select "Phone Number" if you want a phone number.
3. Write an Error Message (Optional)
- Where: The "Error Message" box.
- What it does: It's what the bot will say if the response isn't correct (like "Please enter a valid phone number").
- How to set it up: Write a clear message. It's not mandatory, but it helps guide the user.
Example: Write "Enter a valid phone number".
4. Save Your Configuration
- Where: The "Save" button at the end.
- What it does: Saves the instructions for the bot to request and validate the information.
- How to set it up: Click "Save". If everything is correct, the window will close and a success message will appear. If the name or data type is missing, it will ask you to complete it.
Tip: Make sure to fill in "Name" and "Data Type" before saving.
What Happens When It Runs?
- The bot waits for the person to respond (like sending a phone number).
- It checks if the response matches the "Data Type" (for example, if it's a valid number for "Phone Number").
- If it's correct:
- It saves the response (like "communication.workflow.input.GetEmail = user@email.com").
- It continues to the next step in the flow.
- If it's incorrect:
- It displays the "Error Message" (or nothing if you didn't define one).
- It waits for the person to try again.
Practical Example
You want the bot to request an email address:
- You open the "Input Configuration" window.
- In "Name", you write "Request Email".
- In "Data Type", you choose "Email".
- In "Error Message", you write "Please enter a valid email".
- You click "Save".
Result: The bot waits for an email. If someone writes "john@example.com", it saves it and continues. If they write "123", it says "Please enter a valid email" and waits for another response.
Simplified Special Tricks
Automatic Validation
- What it does: The bot checks that the response is of the correct type (like an email with "@").
- How to set it up: Just choose the appropriate "Data Type".
Example: "Phone Number" rejects letters and accepts "+123456789".
Custom Message
- What it does: Guides the user with a clear error if they make a mistake.
- How to set it up: Write something helpful in "Error Message".
Example: "Numbers only, please" for "Number".
Troubleshooting Tips
- Can't save? Make sure to fill in "Name" and choose a "Data Type".
- Bot not moving forward? Check that the "Data Type" matches what you expect (for example, "Email" doesn't accept numbers alone).
- Not showing the error? Confirm that you wrote an "Error Message" if you want it to appear.
That's it! You've configured your bot to request and validate information. Fill in the name, choose the data type, add an error message if you want, and save. Soon your bot will be collecting data like a pro. If something doesn't work, check the fields or ask your team for help. Happy input gathering!